先决条件
- 每个节点必须有等量的硬盘
- 每个节点有一块硬盘的情况下,至少需要 4 服务器
- 每个节点有两块硬盘的情况下,至少需要 2 服务器
域名解析
每个节点都需要一个域名,域名应该为连续的例如:
minio-01.example.comminio-02.example.comminio-03.example.comminio-04.example.com
取其中一台节点或单独准备一台作为负载均衡代理服务器,同时需要设置泛域名解析:
minio.example.com*.minio.example.com
硬盘格式化
为了保证节点重启后硬盘顺序是准确的,每个硬盘应该拥有一个标签,例如下面的 DISK1
$ mkfs.xfs /dev/sdb -L DISK1
$ mkfs.xfs /dev/sdc -L DISK2
$ mkfs.xfs /dev/sdd -L DISK3
$ mkfs.xfs /dev/sde -L DISK4
硬盘格式化完毕后修改 /etc/fstab 文件,在文件末尾添加以下配置,使其开机自动挂载
  # <file system>  <mount point>  <type>  <options>         <dump>  <pass>
  LABEL=DISK1      /mnt/disk1     xfs     defaults,noatime  0       2
  LABEL=DISK2      /mnt/disk2     xfs     defaults,noatime  0       2
  LABEL=DISK3      /mnt/disk3     xfs     defaults,noatime  0       2
  LABEL=DISK4      /mnt/disk4     xfs     defaults,noatime  0       2
完成后重启服务器,检查挂载无误。
在每个节点中部署 MinIO
Ubuntu 22.04 部署命令:
wget https://dl.min.io/server/minio/release/linux-amd64/archive/minio_20230916010147.0.0_amd64.deb -O minio.deb
sudo dpkg -i minio.deb
使用软件包方案安装会自动创建 systemd 服务文件,无需手动创建。
软件包安装完成后需要添加服务启动用户:
groupadd -r minio-user
useradd -M -r -g minio-user minio-user
为此用户授予数据盘权限:
chown minio-user:minio-user /mnt/disk1 /mnt/disk2 /mnt/disk3 /mnt/disk4创建 MinIO 启动配置
创建或修改文件:/etc/default/minio
# Set the hosts and volumes MinIO uses at startup
# The command uses MinIO expansion notation {x...y} to denote a
# sequential series.
#
# The following example covers four MinIO hosts
# with 4 drives each at the specified hostname and drive locations.
# The command includes the port that each MinIO server listens on
# (default 9000)

# 4 个节点,每个节点拥有 4 个硬盘
MINIO_VOLUMES="https://minio{1...4}.example.net:9000/mnt/disk{1...4}/minio"
# 4 个节点,每个节点拥有 1 个硬盘
#MINIO_VOLUMES="https://minio{1...4}.example.net:9000/mnt/disk1/minio"


# Set all MinIO server options
#
# The following explicitly sets the MinIO Console listen address to
# port 9001 on all network interfaces. The default behavior is dynamic
# port selection.

MINIO_OPTS="--console-address :9001"

# Set the root username. This user has unrestricted permissions to
# perform S3 and administrative API operations on any resource in the
# deployment.
#
# Defer to your organizations requirements for superadmin user name.
# 控制台账户
MINIO_ROOT_USER=minioadmin

# Set the root password
#
# Use a long, random, unique string that meets your organizations
# requirements for passwords.
# 控制台密码
MINIO_ROOT_PASSWORD=minio-secret-key-CHANGE-ME

# Set to the URL of the load balancer for the MinIO deployment
# This value *must* match across all MinIO servers. If you do
# not have a load balancer, set this value to to any *one* of the
# MinIO hosts in the deployment as a temporary measure.

# MinIO 控制台地址,后面 nginx 会用到
MINIO_BROWSER_REDIRECT_URL=https://minio.example.com/minio/ui
# MinIO 控制台地址
MINIO_SERVER_URL=https://minio.example.com
# MinIO 存储地址,实际使用应该是 [bucket].minio.example.com
MINIO_DOMAIN=minio.example.com

# 不要修改此配置
MINIO_REGION=us-east-1
为 MinIO 节点间添加 TLS 证书
下载证书生成工具,amd64 架构:
wget https://github.com/minio/certgen/releases/download/v1.2.1/certgen-linux-amd64其他架构自行在 https://github.com/minio/certgen/releases 寻找下载即可
生成证书:
此操作只需要在一台节点执行
chmod +x certgen-linux-amd64
mv certgen-linux-amd64 certgen
./certgen -host "minio-01.example.com,minio-02.example.com,minio-03.example.com,minio-04.example.com"
将生成后的 private.key 和 public.crt 传到每个节点的 /home/minio-user/.minio/certs/ 目录下并赋予权限:chown minio-user:minio-user -R /home/minio-user
启动 MinIO 服务并检查服务是否正常运行
sudo systemctl start minio.service
sudo systemctl status minio.service
部署负载均衡服务器
安装 Nginx
apt install nginx申请 SSL 证书
apt install certbot pip
pip install --upgrade certbot
pip install certbot-dns-powerdns
创建 PowerDNS 认证文件:/root/pdns-credentials.ini
dns_powerdns_api_url = url
dns_powerdns_api_key = token修改文件权限:chmod 600 /root/pdns-credentials.ini
申请证书
certbot --authenticator 'dns-powerdns' --dns-powerdns-credentials '/root/pdns-credentials.ini' certonly -d *.minio.example.com -d minio.example.com --agree-tos --email [email protected] -v配置 Nginx
# vi /etc/nginx/sites-available/minio
# 注意加粗位置
upstream minio_s3 {
    least_conn;
    server minio-01.example.com:9000;
    server minio-02.example.com:9000;
    server minio-03.example.com:9000;
    server minio-04.example.com:9000;
}

upstream minio_console {
    least_conn;
    server minio-01.example.com:9001;
    server minio-02.example.com:9001;
    server minio-03.example.com:9001;
    server minio-04.example.com:9001;
}

server {
    listen 443 ssl http2;
    listen [::]:443 ssl http2;
    server_name minio.example.com;
    ssl_certificate "/etc/letsencrypt/live/minio.example.com/fullchain.pem";
    ssl_certificate_key "/etc/letsencrypt/live/minio.example.com/privkey.pem";

    # Allow special characters in headers
    ignore_invalid_headers off;
    # Allow any size file to be uploaded.
    # Set to a value such as 1000m; to restrict file size to a specific value
    client_max_body_size 0;
    # Disable buffering
    proxy_buffering off;
    proxy_request_buffering off;

    location / {
        proxy_set_header Host $http_host;
        proxy_set_header X-Real-IP $remote_addr;
        proxy_set_header X-Forwarded-For $proxy_add_x_forwarded_for;
        proxy_set_header X-Forwarded-Proto $scheme;

        proxy_connect_timeout 300;
        # Default is HTTP/1, keepalive is only enabled in HTTP/1.1
        proxy_http_version 1.1;
        proxy_set_header Connection "";
        chunked_transfer_encoding off;

        proxy_pass https://minio_s3; # This uses the upstream directive definition to load balance
    }

    location /minio/ui/ {
        rewrite ^/minio/ui/(.*) /$1 break;
        proxy_set_header Host $http_host;
        proxy_set_header X-Real-IP $remote_addr;
        proxy_set_header X-Forwarded-For $proxy_add_x_forwarded_for;
        proxy_set_header X-Forwarded-Proto $scheme;
        proxy_set_header X-NginX-Proxy true;

        # This is necessary to pass the correct IP to be hashed
        real_ip_header X-Real-IP;

        proxy_connect_timeout 300;

        # To support websockets in MinIO versions released after January 2023
        proxy_http_version 1.1;
        proxy_set_header Upgrade $http_upgrade;
        proxy_set_header Connection "upgrade";

        chunked_transfer_encoding off;

        proxy_pass https://minio_console; # This uses the upstream directive definition to load balance
    }
}


server {
    listen 443 ssl http2;
    listen [::]:443 ssl http2;
    server_name ~^([\w-]+)\.example\.com$; # 这里对应泛域名

    ssl_certificate "/etc/letsencrypt/live/minio.example.com/fullchain.pem";
    ssl_certificate_key "/etc/letsencrypt/live/minio.example.com/privkey.pem";

    # Allow special characters in headers
    ignore_invalid_headers off;
    # Allow any size file to be uploaded.
    # Set to a value such as 1000m; to restrict file size to a specific value
    client_max_body_size 0;
    # Disable buffering
    proxy_buffering off;
    proxy_request_buffering off;

    location / {
        proxy_set_header Host $http_host;
        proxy_set_header X-Real-IP $remote_addr;
        proxy_set_header X-Forwarded-For $proxy_add_x_forwarded_for;
        proxy_set_header X-Forwarded-Proto $scheme;

        proxy_connect_timeout 300;
        # Default is HTTP/1, keepalive is only enabled in HTTP/1.1
        proxy_http_version 1.1;
        proxy_set_header Connection "";
        chunked_transfer_encoding off;

        proxy_pass https://minio_s3$request_uri; # This uses the upstream directive definition to load balance
    }
}
启动 Nginx
ln -s /etc/nginx/sites-available/minio /etc/nginx/sites-enabled/minio
systemctl restart nginx
MacOS 安装和使用 MinIO 客户端
brew install minio/stable/mc
mc alias set minio/ https://minio-01.example.com:9000 username password
有些程序内嵌的 S3 SDK 使用上可能会有兼容问题,一开始的区域 us-east-1 其实就是默认区域,如果修改可能导致不能正常接入使用。
当遇到异常错误时,客户端的 mc admin trace -v minio/ 命令可以非常好的帮助调试问题。
这里重点点名群晖的 Hyper Backup,接入的时候出现异常但没有提示任何有效的错误信息。
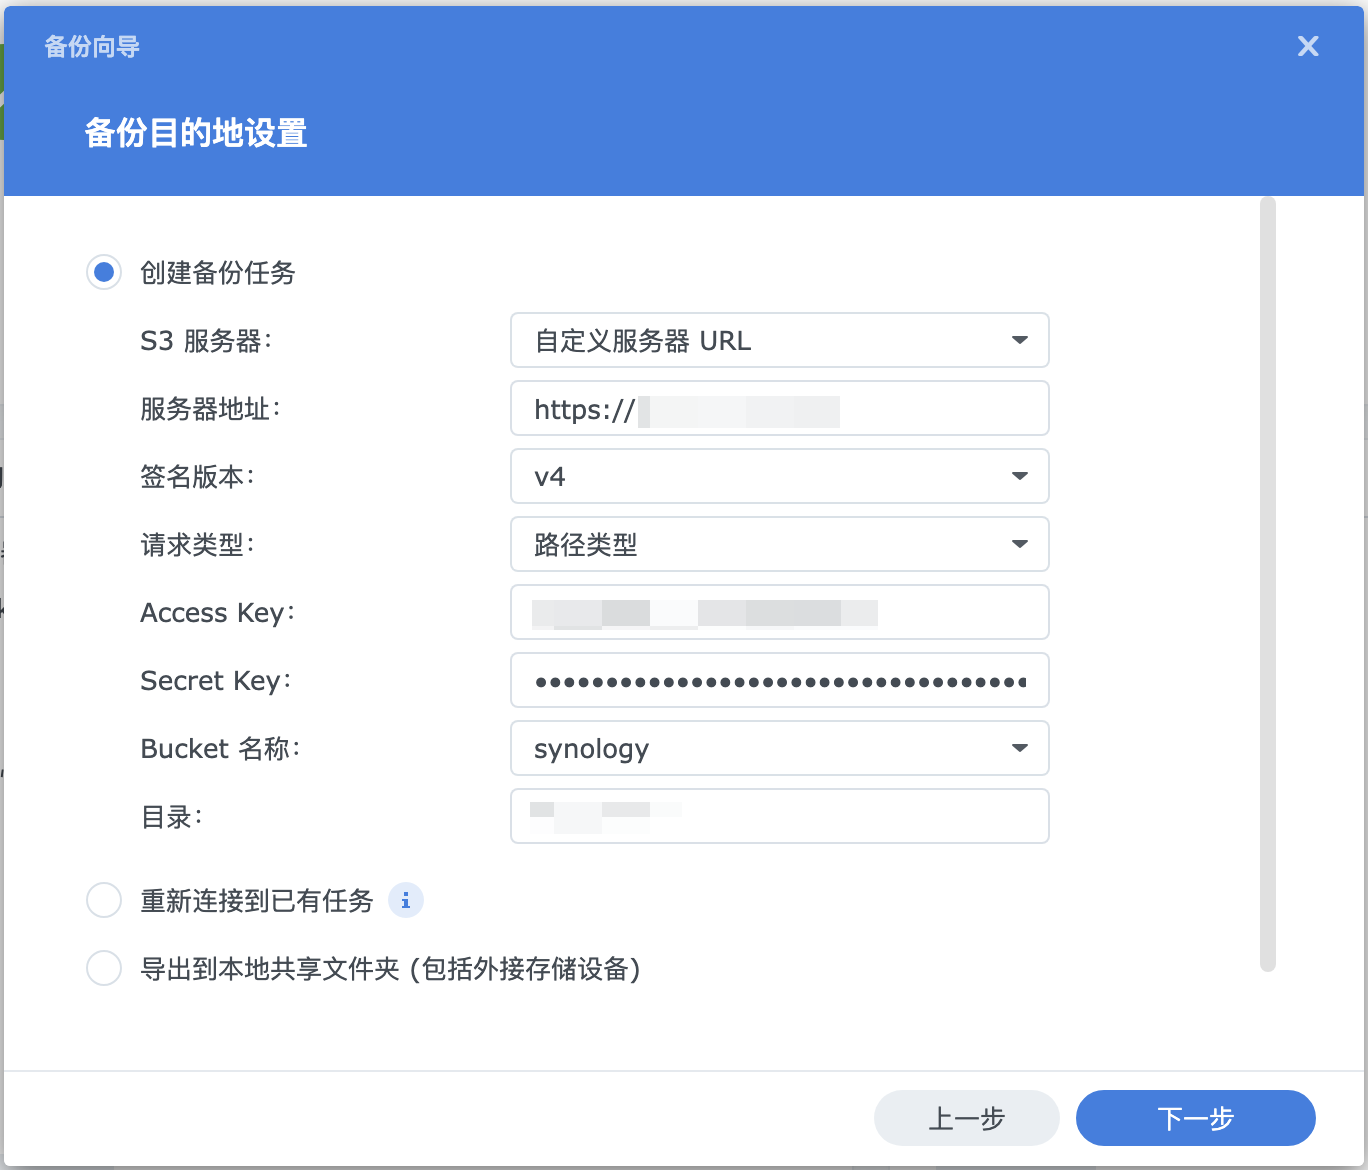
群晖 Hyper Backup 接入设置
解决使用 root 用户执行 minio 后造成的权限问题
API错误:
<?xml version="1.0" encoding="UTF-8"?>
<Error><Code>AccessDenied</Code><Message>Access Denied.</Message><Key>files/test.txt</Key><BucketName>test</BucketName><Resource>/test.txt</Resource><Region>us-east-1</Region><RequestId>xxxx</RequestId><HostId>xxxx</HostId></Error>

网页错误:
{
    "detailedMessage": "Access Denied.",
    "message": "an error occurred, please try again"
}
切换到对应的挂载点,例如 /mnt/disk1 后执行:chown -R minio-user:minio-user .minio.sys
结束
一切顺利的话,到此时 MinIO 和负载均衡服务就已经可以正常使用了。
MinIO 控制台地址:https://minio.example.com/minio/ui/